Facebook is a great way to keep in touch with both close friends and new friends you make but, as your number of friends increase you will start to miss out on updates or see too many updates from someone you aren’t very interested in. This dilutes the value of Facebook both as a personal network builder and marketing tool. So, here is where lists come in…
Creating lists for your friends and categorising them helps makes sense of the chaos. (Friends can be added to multiple lists too.) These lists can then be used to view New Feeds and send out information and updates.
Categorising friends may seem like a lot of work initially but in the long run it will help organise Facebook for you. Among other things, it will allow you to send group mails and most importantly set-up you privacy well. Do it, you’ll be glad you did it : )
Create your lists based on how you would like to group your friends and how you know them or interact with them. For Example – As a gamer I have created atleast two lists for games – e.g. Friends on Freado and Freado (I have other lists too – school friends, work friends, family,…). On one list I have friends who play the game too. On the other, people I do not know at all but who are friends I play games with on Facebook.
Why do you need these lists? Here’s why.
Viewing Updates from Friends by List
What if I told you that you can choose to view updates from just school friends, or college friends, or work friends, or even your marketing circle? You can do that, here’s how.
1. Click on ‘Most Recent’ above your News Feed on Facebook Home.

2. In the drop down menu, click on ‘Choose Another’ to see more Lists.
3. Choose the list you would like to view.
I love this method to see group updates or game updates.
Marking Status Updates viewable only to specific Lists
You can even mark each status update to be viewable only by specific people or not by some lists. This helps send out targeted messages not only for marketing but also when some information you are sharing is private or hidden from some.
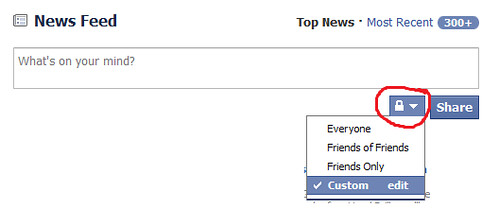
1. Click on the little ‘Lock’ icon below the Status Message box, right next to Share.

2. Choose the ‘Custom’ option.
3. Select the audience that can and cannot view your post.

Now onto creating those all important ‘Lists’. Here’s how to create them –
1. Click on the ‘Account’ tab on the right-top-corner of the page.
2. Choose and click on ‘Edit Friends’

3. Click on the ‘Create a List’ button

4. In the pop-up type the name of the list

5. Select friends for the list. (You can do this later too.)
6. Create as many lists as you need following the same process from Step 3 onwards.
You can also add friends after the list has been created.
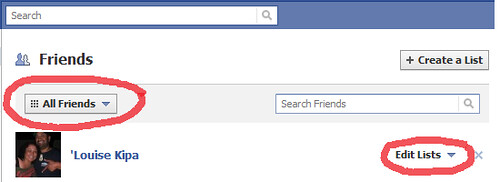
1. Choose the ‘All Friends’ option on the ‘Edit Friends’ page.
2. For each friend choose the ‘Edit Lists’ option and choose the lists.

Creating Lists is a tedious process the first time its done and the more friends you have the more time and effort it takes. So start early and maintain the lists as you go. You’ll be glad you did this as your Facebook friends group gets bigger.
How do you categorise/group friends? Do you have any special lists?


